

I have been baking apple pies for as long as I can remember. (Thanks Mom!)
Of course, as my nutritional knowledge and needs changed, so did our pie. Over the years, we have taken out the gluten and dairy, as well as lowered the sugar tremendously. All in all, it is still a fabulous, delicious pie we all enjoy. In our house, it wouldn’t be Thanksgiving or Christmas without one on the table!
The absolute best time to make these pies is right after apple picking at your favorite Apple Farm. This makes the freshest pie, so full of flavor. We have baked and frozen our pies to save for the holidays, and they are still fantastic when ready to be eaten.

In this season of Thankfulness, we would like to share our pie with you!

You will need:
Apples – we like to use about 8-10 apples, depending on the size, and mix up the types. We are always trying different combinations. Use your favorite apples. You want enough to mound up in the pie dish, as they will settle down as they bake. (Harder apples bake well.)
2T organic brown rice flour or sweet rice flour
2t ground cinnamon
1 t ground nutmeg
½ medium-size lemon
2T pure maple syrup
Clean, peel, and slice up your apples. You can have a chunky pie, cutting the wedges into small chunks, or thin slice the apples to make a fancy spiral in your pie. This is your preference- it is fun to create your own style. For now, however you slice them, put them all into a large bowl. Squeeze the lemon juice over the apples and give it a good toss. Add the cinnamon, nutmeg, flour, and maple syrup. Stir it up and let it sit. As it hangs out, all the juices start to flow and all the flavors blend together. Already, the smell is fabulous!
On to the pie crust:
We have tried so many gluten-free pie crusts, blending multiple different flours, butter and oils. This is the one we stick with for our pies and our quiche. It has a blend of flours, but I feel as though it makes the best result- just make sure you cook it through completely.
*Busy Mom Tip: Make a couple of pie crusts at once and freeze the ones you do not use right away. On a busy day- take the crust out of the freezer in the morning. Then, for dinner throw together a quick quiche and put it in the oven. While the quiche is cooking, you can put together a salad or other great side, and dinner is set! Even better, you can also bake the quiche the night before and serve it cold. Leftovers make a great lunch as well.
To make the pie crust for our apple pie you will need:
½ cup organic brown rice flour
½ cup chickpea flour
½ cup sweet rice flour
¼ cup tapioca starch
¼ cup potato starch
1 ½ t guar gum
4T Earth Balance Butter + 4T Olivio Coconut Spread or Coconut Oil
(You can also use all Earth Balance Butter or Coconut Oil instead but we like how the combination works here)
Pinch of sea salt
½ cup cold water
4t apple cider vinegar
In a bowl, combine all the flours, guar gum, and salt. Mix well. Using cold butter cut up into pieces, or the coconut oil, use a hand-held pastry blender or fork, and cut the butter/oil into the flour mixture. Keep working until it comes together forming little pea-sized balls. Make a well in the middle and slowly add in the water and the vinegar. Mix until combined. Knead the dough a bit with your hands. If the dough is too wet, add a little bit of rice flour. Do not overdo it as it will dry out the dough if you add too much flour. Once it has all come together, and you have nice ball, replace it back in the bowl. Put it in the fridge for about 10-15 minutes, covered. This makes the dough easier to work with when you are ready to assemble the pie. If you leave the dough in the fridge too long, you will need to let it sit out a bit before working with it, as it will get too hard.

Take the dough out of the fridge and cut in half. Using one half, make a ball and place it in the middle of your 9-inch pie plate. Using your fingertips and the heal of your hand, slowly push the dough out to fill the bottom of the pie plate and up the sides. You want to have a little extra to make the ridges around the top of the plate when complete.
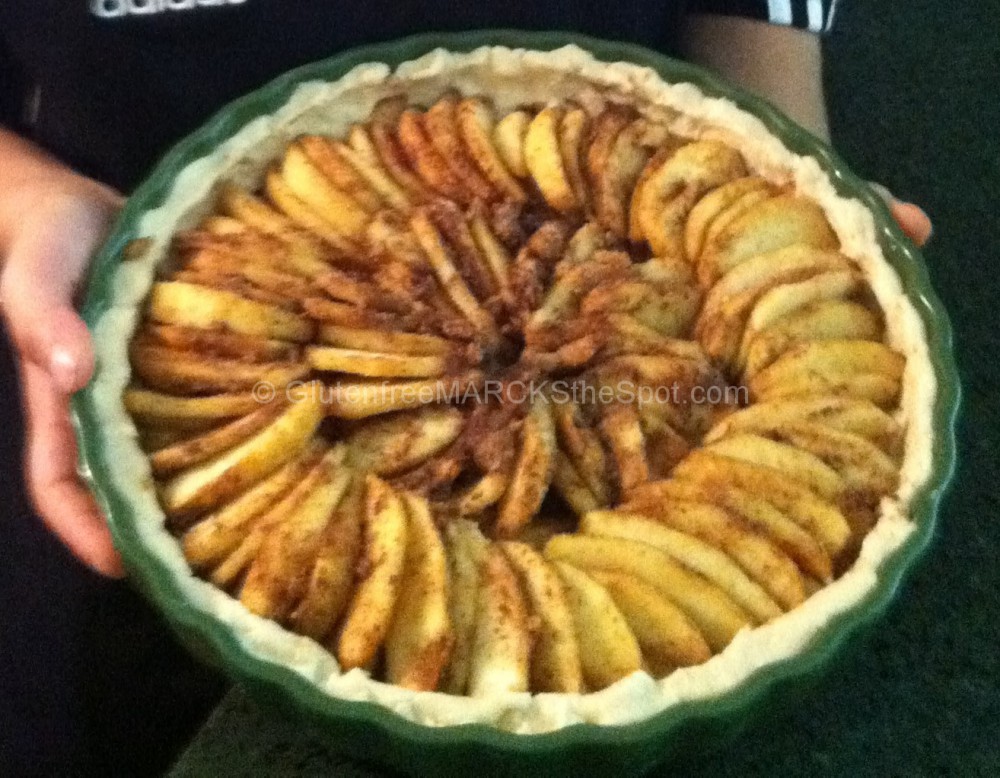
Once you ha ve the bottom dough set, pour your apple mixture into the pie plate and gently pat it down to fit it all in, mounding it up in the middle. Or if you are being fancy, lay the apple slices in the pie crust forming an inner and outer spiral formation.
To make the top crust, take a sheet of saran wrap, or wax paper, and shake a little bit of rice flour over the paper. Place the other half of the dough on top and roll it out – you will need to add a little bit of flour so it doesn’t all stick together- but, not too much. Using a knife, cut the dough into long strips. You can be fancy and criss-cross them over each other as you place them on top of the pie, make your own design, or have an open faced pie as well.

If using a top layer, crimp the edges all the way around, meeting the top and bottom layers together. You can add little bits of butter (Earth Balance or coconut oil) across the top of the pie to help give your pie a beautiful color. I also like to lightly sprinkle more cinnamon across the top.
Place in a preheated 425 oven and bake for 15 minutes. Turn the oven down to 350 and bake another 45-50 minutes, until the pie crust is nicely browned (but not burnt!) and the apples are bubbling beautifully.
During the baking process, if you notice the edges of the pie crust starting to brown too quickly, you can cover them with foil (just the edges), to allow the pie to continue to bake.
Let cool completely. Bask in this delicious smell of your house. Enjoy!

If you try this recipe, please come back and let us know how it worked out for you.
Sending you happiness for a splendid Holiday Season!
Enjoy!
Continue building your best Gluten-Free
life over in our Facebook Group!
Click below to join:


